February 27, 2011

Art in the Garden

Winter chills and unexpected snow storms are almost gone now that it is close to March.  Its time to start looking toward spring and thinking about those backyard gardens. Planting seeds and flower starts is just around the corner.  I wanted to share with you some photos of Found Objects that are used as garden art in unexpected ways.  My favorite gardens are ones you could describe as organized chaos.  Like those found in cottage gardens.  Those that look well tended too but also have a wild feeling about them that spark the imagination of English country sides.  My favorite art piece in gardens are the flowers but I do like to throw in a few accessories.  Items that were intended for other uses but give the garden a charming look are my favorite.  Below are some examples of objects that were reused in imaginative ways in the yard.

 These two mini chairs are from my own backyard.  Susan gave them to me when she and Tim were moving.  They were a dark forest green color.  With a little bit of sanding and some outdoor weather paint I turned these chairs into wall art for the fence.  This spring I will finish them and make the seats into a bird bath and a bird feeder.  I've already seen the birds using them as perches.

 Cute windows without the glass.  I would like to see some vining clematis or morning glory winding around the frame as well.

 A urinal.  Different, but still funky and something to talk about.

 A clever way to make your down spout an art feature instead of another piece of the house.

 I love this red dresser.  It would look perfect against a fence or side of the house in a country style garden.

 Very unique use of space.  Old tires are used as grass stepping stones through the gravel path.  Yellow bowling balls are made to look like they are growing within the flower beds and mirrors on the wall give this backyard a masculine feel.

 Flowers in bicycle baskets are always a fantastic idea.  Painting the bike white would make it really stand out against the tree and mulch in the flower bed.

 Grow plants in an old sink.  I think these are strawberries.

 An unexpected use of an old brazier.

 This Salmon sculpture is the essence of the Northwest

 Bamboo poles make a great shelf to grow plants on.  If you have a small area and not much space to plant containers on the ground or deck, why not use the vertical space of a fence or wall to grow your veggies or flowers?

 This is my favorite garden shed.  My grandma used to have one similar to this that she used as her art studio during the spring and summer.

Another use of old tires.  These mini trees look very whimsical in these tires.  Almost like they came out of a Dr. Seuss book.
Do you have old shoes, rain boots or sneakers?  Why not use them as planters? 

February 25, 2011

D.I.Y. Dog Collar


I know that I don't have a dog yet but I've been wanting to try making my own dog collar for  a few months now and decided that I should just do it.  I figured I can either use it in the future for my own dog (hopefully) or I can put it on my etsy site to sell.  It did not take very long at all.  I spent 20 mins at most sewing it together. 

Supplies:

  • 3 yards 1" webbing
  • 1 yard ribbon of your choice 1" or smaller
  • 1 D-ring
  • 1 slider 1"
  • 1 buckle  1"
  • 1 clip (if you plan to make a matching leash)
  • I decorative flower (optional)
All of these supplies can be found at a fabric store.  I found mine at Fabric Depot in Portland but I have seen them at Joanne's Fabric also.  I spent a total of  $12.74 for my supplies.  That's pretty cheap for a cute collar seeing as how most collars are between $20 and $30 in the store.  Make sure when you are buying your supplies that the width of the webbing and ribbon will fit through all of the hardware.
Here are the supplies I used to creat the collar.  There is an extra clip to make a matching leash.  I chose just to make the collar but the leash is pretty straightforward I didn't include it in this how to blog. 
First, sew the ribbon onto the webbing.  I bought a little bit extra of the ribbon so I could tuck it around the back side so when you sew the webbing together after the hardware is on the ribbon has a smooth look.  You could also use a cute fabric design if you like instead of ribbon.  Go slow to achieve an even sewing line.
Next place your d-ring on first followed by the female end of the buckle.
Tuck the ribbon over so that it lays behind both the buckle and the d-ring. Sew a square pattern with a criss cross through it behind the buckle.  The criss cross adds extra durability.
Repeat the criss cross square behind the d-ring

 On the other side put the slider and the male buckle end on the webbing so that it looks like this.  This part was the most confusing of the whole process.  It took me a few time to get it right.

 Then bring the webbing back through and under the first layer of webbing like this.  Once it is through the slider, adjust the webbing to find the correct width to fit on your puppy.  For example, a Boston terrier has a neck width of 12 to 18".

 Once you find the correct adjusted length, sew the end onto the rest of the webbing.  Make sure you sew it to the correct piece of the webbing so that it is still adjustable.  It should look like this when you are finished.

If you have a girl dog you can add a cute flower decal to your collar.  If its a boy, why not add a bow tie. The last step is to find a cute dog to put it on.   That's it your done!

February 24, 2011

Craft Room Blues

Lately I've been feeling somewhat depressed.  I think that I need a change in my living situation.  The thought of moving into a new place as becoming very appealing lately.  I would especially like space for my own craft room.  However,  the place we live in now is really cute and we like the yard and we can't beat the price.  So instead of moving and paying deposit fees, more money for rent and new furniture, I have decided with a lot of decluttering and some creative thinking I can make my bedroom into my own craft/sewing studio.  Currently I have no real home for any of my supplies.  My fabric and yarn are bursting out of boxes and bags.  My closet is a mess of tupperware full of Christmas and Harry Potter decorations.  And my craft cabinet is about to explode with paint, scrapbooking and misc. supplies that don't fit in there any more. 

 This is what my "craft room" looks like at the moment.  A lot of boxes and bags that are over filled with supplies.
 Inside my craft cabinet isn't any better.  It is stuffed with scrapbook supplies, misc. tools, photos, paints and other various items. 


So here are some inspirational photos to get me in the mood for a new crafting area.

My favorite part of this sewing room by Courtney Burge from home-designing.com is the wooden thread holder.  A simple concept but much more effiecient than the ziploc bag I have mine in where they get tangled and knotted together constantly.

I like the idea of using a peg board to hang misc. scissors and supplies.  This room is also designed by Courtney Burge.  It would be especially cute to paint the pegboard a seperate color from the wall and frame it in a white trim.
 Designed by Tofu Studio home-designing.com The open shelving with wall paper behind really appeals to me.  I could put a different craft catagory in each shelf cubby and put my craft books on the shelf.  I would like to do something similar with some baskets to hide the clutter that will eventually build up.
I love the soft colors in this room.  Stacked fabric in the cabinet looks organized and inspiring.  Much better than the boxes I have mine stored in

A ribbon rack and shelves for jars and canisters makes a great use of wall space
A space for scrapbooking supplies is also a must.  I have a ton of paper and a few large stacks of stickers that desperately need a new home.

I would also like to buy a few jewelry stands for photo shoots so I can post them on my etsy site.

A mannequin would also be helpful for displaying my dresses, aprons and scarves I have made
My grandmother gave me her old singer sewing machine similar to this one from the late 1800's that was pasted down to her.  Someday I would love to be able to display it and possibly use it as a working area.

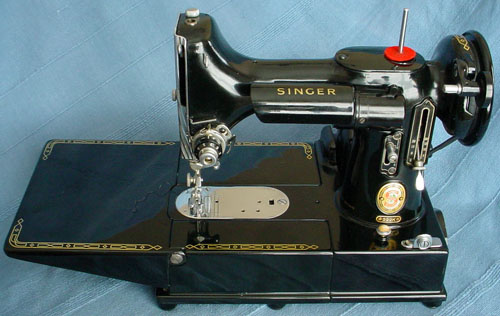
 She also gave me a Singer sewing machine from the 1950's that is just sitting in the back of my closet.  I would like to be able to build a wall shelf and place it on display

Finally I want a cute way to display my yarn collection, something like this would be fun.  I just bought a white pitcher to put my knitting needles in

February 17, 2011

Gnome Week: Day 8 The Final Day

Today is the last day of blogging for gnome week.  I mentioned in Day 1 that gnomes run on a different time schedule and gnome week was so special that it had an extra day in it. It might be the last day of this series of gnome blogs, but I assure you this will not be the last you hear about the gnomes.  They are so invasive they will not tolerate being left out for too long.  So for now, here is the last gnome and lesson of the week.

Gnome of the Day: Herbert

Herbert is a very special gnome.  He's dressed quite differently than the other gnomes.  He's sporting a green hat with flowers and lady bugs on it, a tie dye shirt, blue nail polish and lady bug goulashes.  He isn't quite as old as the other gnomes in the yard.  You can tell because his beard hasn't turned white yet.  Herbert is a herb expert and is trained in using herbs for medical purposes.  He uses his knowledge whenever the other gnomes feel sick and when an animal in the neighborhood is hurt.  Today, he is helping out in the office at work.  He's been noticing our houseplants need some extra care lately and he has volunteered himself to water, fertilize and trim all the houseplants.  In exchange we are letting him pick through the seed packets to use in his herb garden.


Note:  I painted Herbert myself at the Potter Place on 2nd and Jefferson downtown.  They had a few other gnomes to chose from and some you could special order in.  I think he turned out really cute.  I might end up painting a whole Herbert family.

Gnome Lesson of the Day: Gnome Liberation Movement


 There is a downside to having gnomes in your lawn and garden.  Some people believe that it is unjust and not humane to force garden gnomes to stay prisoners to the yards of humans.  These people believe gnomes should be set free so that they can lead their own lives or be paid to stand around in the garden through the sun, rain and snow.  These people are usually part of the organization called Gnome Liberation Front.  This is an international organization.  I have heard that the French take this issue very seriously.  Not only do the members of this group rally for the freedom of gnomes but they even go so far as to steal them out of peoples yards and either set them free in the woodland, their natural home, or they smash them, believing that they are freeing their souls from there oppressed world.  There is a group here close to Corvallis where people less aggressive.  These people will leave notes on the person's doorstep, letting them know how they are imprisoning the gnomes and hope the owner will make up their own mind and set them free.


I think this gnome liberation movement fails to recognize that gnome owners usually care deeply about the gnomes in their yard.  They took great care in picking out the right gnome and the right place in the yard they should dwell.  Together I think that gnomes and people bring each other joy in both their lives.   So take precaution!  Its great to be excited about your gnomes but make sure the person you are bragging too isn't part of the Gnome Liberation Movement or you might not see your gnome again.

February 15, 2011

Meet Gertie and Bram

Meet Bram and Gertie- husband and wife felted pins

This weekend I finally finished my felt gnome pins I've been working on for over two weeks now.  The boy is Bram and the girl is Gertie along with their mushroom friend.  They are felted broaches I hand cut and sewed.  They are 3 1/2 inches tall and 2 1/2 inches wide.  They are just so cute.  If anyone is interested I have them for sale on my etsy.com site  http://www.etsy.com/shop/bunnygirl7  I've been wearing Bram for most of gnome week.  You can wear them on a shirt, sweater, jacket, purse, apron or whatever else you can think of.


Gnome Week: Day 6

Gnome Saying of the Day:  "Schmidt's Garden Center...we gnome the garden business"  -Schmidt's Gnomes

Gnome of the Day:  Shiitake

This gnome's name is Shiitake.  I don't know if his mother knew he would end up loving mushrooms when he grew up or if its pure coincidence but this fellow has only one thing one his mind: mushrooms.  He spends most of his day in search of the fungi.  He eats them with every meal in soups, salads, omelets, on toast and on slug kabobs.  But he's not selfish, he likes to share his findings with the other gnomes that live in the yard.  Right now he has just come back from a long day in the neighborhood and is catching the last few rays before the sun goes down.
Shiitake the Gnome


Gnome Lesson of the Day: A trip through Schmidt's memory lane and some of the gnomes that have appeared in our emails in the past.

The gnome invasion of Schmidt's has become worse than we thought.  At first we assumed we could lessen the problem by putting them on sale or putting them to work in the greenhouse.  But I've realized that they've not only colonized the store but they've also taken over our emails!  They started appearing last holiday season when the elves took over the store and made a mockery of the gnomes.  Since then, the gnomes have appeared more and more in our emails and now they have an entire week devoted to them.  I didn't know we were making the problem worse until now.  Soon they will be calling in their cousins and other relatives to come visit and take residence at our store.  If that happens we will be wall to wall  gnomes and we won't have any room for any other merchandise.  I hope it never gets that bad.  

For now, here are some photos of gnomes that have appeared in past emails.
 As mentioned yesterday, this gnome was tied to a tree by an elf while the elves took over the store and decorated for the holidays.
This is a never before scene photo of last years staff party.  We usually come to staff events dressed as silly as possible.  This year we had a poor helpless gnome (me) being dragged around my Miss Clause and her elf assistant.  I had to sit through dinner tied up all night while everyone "helped" by putting food items just outside my reach while I struggled to free myself.
 Brandy is trying out a new method to remove gnomes with a fly swatter. 

 This gnome had no sense of humor and threatened to call the authorities for gnome mistreatment.  We only wanted him to hold a few bags of daffodil bulbs.  What a drama queen.

This was our Civil War add for the OSU vs U of O football game in 2010

Related Posts Plugin for WordPress, Blogger...