Showing posts with label Home Decor. Show all posts

August 21, 2012

Dreaming of a New Craft Room

Ok, so if you follow my blog at all you may be familiar with my on going desire to have a functioning craft room.  I am sloooowly getting there.  Last summer I bought/painted a sewing desk, found a giant bookcase from IKEA and made a rack to hold all of my ribbon and thread.  Sounds like I have it all figured out right?  Well....

Currently the bunnies and their pen are being housed in my room (the only one with a/c) so its a pretty tight squeeze for everything in there.  At least all of my craft supplies have a home.  But, the other problem is I have run out of storage for my packaging supplies.  I am creating bigger pieces such as dog beds and skateboard dishes and don't have any room to store the boxes I've been collecting to ship them.

So this weekend I got super excited to start designing my very own craft room for next year if we hopefully find a larger place.  And while I'm waiting for that day to come I have been keeping myself busy designing my dream craft space.  Here is a recap in photos of what I've done so far and my plans for my new room in the future:


This is what I started with at the beginning of last year.  It was far from ideal. I did not have enough storage for anything and it all ended up on the floor.


So then I bought this monster shelf from IKEA to house all of my crafts and books.  Which is an amazing feat since I have a ridiculous amount of stuff. 


I then got this great desk from Brandy and painted it red and added new hardware to match the black shelf.  While I was at it I also painted my dresser pictured in the previous photo to match the desk.


Here is the shelf in the room with my ribbon rack above.  As you can see, it is in the way of the closet which makes finding my shoes in the mornings really difficult.  But it works for the time being.


So now I am at the point of picking out new colors for my future craft area.  I know I want to continue with red and black since I already have those items.  I think I also want to throw in a bit of turquoise accents and maybe an off white or beige color for the walls.


Here is a sketch I put together yesterday of my ideal craft room. My red dresser would be the focal point with a couch and my sewing desk positioned where I can also watch tv while I work or when friends come over.  To the side I have my large bookcase with all of my craft supplies.  I would use the closet space for storage of my larger projects and packing materials. I also thought it would be fun to frame the tv with fabric behind it and a large turquoise picture frame in front.  On pinterest I saw this great idea to have your walls painted one color and then put white molding near the top of the wall and then paint the remainder of the walls and ceiling a sky blue.  It looked really pretty, I would like to try it out.


Here is my proposed floor plan.  Hopefully I can find a bedroom large enough to squeeze in a love seat or small couch! And obviously this is a loose plan since I don't even have a room to make an actual layout for.


I also grabbed some material samples to maybe use for some curtains, pillows or for the tv frame.

I hope you enjoyed my little craft room blog.  It will be a while before I get to set it up so hopefully I won't get too antsy!

March 13, 2012

Wall Mounted Stag Fern

 On Sunday I finally finished this stag fern project I have been working on since January.  If you remember my blog post from back then, Amy and I saw these really cool stag ferns that were mounted on pieces of wood at the Portland Nursery.  The ones we saw were very large and cost more than $100 for some of them.  At the nursery I bought a small stag fern for $5 and took it home to mount on my own wooden board.  I planned to finish my project the same weekend I went to the nursery but I haven't been inspired to work on it until this weekend when I went up to Portland IKEA with Amy again and I bought new pottery for my indoor houseplants.  When I got home Sunday afternoon I got down and dirty right away and replanted all of my houseplants and then mounted my stag fern onto its wooden board.

These are the stag ferns we saw at the Portland Nursery on Division St.  The largest one is probably about 3 1/2 feet tall.

 Here are my mounting supplies.  I used a wooden board similar to the one I cut in half for my indoor primrose display, a handful of green basket moss, an airy onion bag and of course my fern.  I also used a staple gun, garden twine and picture frame mounting kit.

First I decorated my board.  I cut off the "feet" that were on the board and then painted the background in brown and orange so that it would match the living room decor.  At first I stained it a dark walnut hue and hand painted the Webster's definition of a stag fern on the board but I did not like the way my hand writing looked so I covered it up with craft paint.  If you look closely you can still see where my writing was.  Then, once the paint dried I put a few coats of polyurethane to seal it from moisture when I water the plant each week.  After it dried I mounted my picture frame hook onto the back before attaching the fern.

Then I cut a 4x6 inch corner of the mess bag to hold the moss that the fern will eventually grow into.  The bag needed to be airy so the roots could easily pass through.

Then using the staple gun I mounted the bag filled with moss just above center of the wooden board.  Since the foliage fell down so low, it looked more balanced to place the bag higher than the center.

Once the bag was in place I took the fern out of its container and placed it on the bag.  Then I filled the area around the fern with more green moss to hide the rest of the red bag.  To keep the fern and the moss in place I wrapped garden twine around the fern, mound and board to keep everything tight and from falling apart.  Eventually the fern will grow a large frond shield that will grab onto the wood and anchor it there by itself.  

To water the fern I simply take it off the wall and put it on the ground outside, water it with a watering can and let the wood air dry before hanging it on the wall again.

This was the perfect item to add to my living room collage.  I am really close to finishing the whole collage and then I will post photos of how it looks with the stag fern added.

February 08, 2012

D.I.Y. Pinched Fabric Throw Pillows


I found this great tutorial to make these puckered pillows from Thrifty and Chic another awesome D.I.Y. blog. This was a pretty easy project. To see the full instructions for this project you can click on the link above.

Here is the original pillow from Thrifty and Chic.

Basically you mark where you want your puckered spots to be and then pinch about a 1/2 inch around the point and tie it up. Continue this across the fabric and that is about it.

Here is the pillow I used for the recover. It was cute but the colors didn't match and it had a few stains on it.

Now it fits the couch perfectly.

January 24, 2012

Autumn Forest Painting


 I finally finished a painting I've been working on since September.  I wanted something to remind me of the fall, my favorite time of the year.  So I painted a group of trees in the woods with lots of oranges and browns to coordinate with the rest of the living room. I love aspens and used them as inspiration for my abstract trees. I didn't really know where this painting would lead me when I started it.  I think that's why it took so long to finish it.  For most of fall it sat on the wall above the couch a blank white canvas with pencil marks on it.  Then in November I finished the sky and the tree canopy.  And finally, yesterday I painted the forest floor and the tree trunks.

This painting is the largest canvas I've painted.  Its by no means the best painting I've done.  Its pretty sloppy and I kept running out of paint so the color doesn't match up in a lot of places.  But, I really like it and from a distance you don't notice my mess ups that easy.


Hurray! The painting looks great above the couch.  

January 23, 2012

Indoor Flowers for Winter

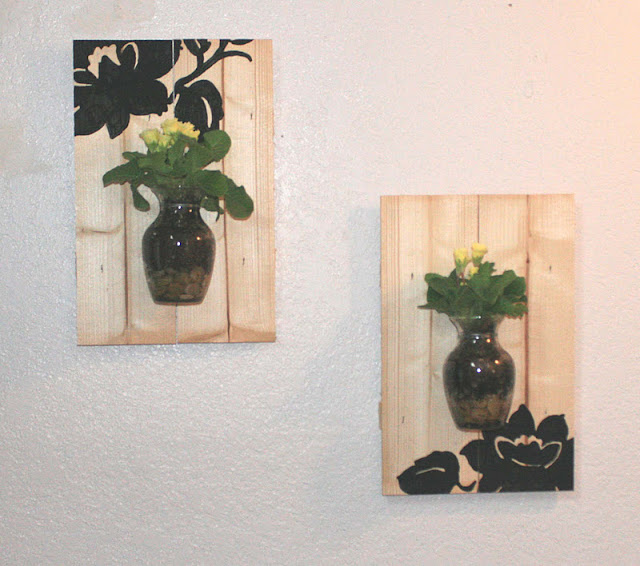
Yesterday I finished another project for the entryway.  I made some wall hung glass vases filled with primrose. This January I've been feeling a little blah with all the rain and clouds everyday so I wanted something to remind me spring is on its way. I chose primrose because to me they symbolize the first signs of spring since they are the first flowers after Christmas that arrive at the garden center. This project was very easy and only took a few hours to complete.  It was inexpensive as well.  I think at most I spent $10 on this project. 

Here are my inspirational ideas.  I wanted to do the glass tubes inside a picture frame (bottom right corner) but I didn't think it would look as well on our white wall in the entryway.  So instead I used a board I had in my possession as the backdrops to these flower containers.

First I painted a design on each of my wooden board pieces.  Originally I wrote out the words "Nature" and "in bloom" on each of the boards but once I did they looked corny to me so I covered them up using the same stencil as on my desk from early this summer.  Click here to see my previous desk project.


Once the paint was dry (I let it sit overnight) I used the drill gun and made two holes a few inches apart where I wanted my glass jars to hang.


Then I potted up my primrose.  Since there is no drainage in the vases I filled the bottom half with decorative stones to keep the roots from rotting.
Then I used some leftover wire to wind 3 times around the neck of the vase and twist tied the wire together to keep it from slipping.  I then pulled the wire through each of the holes I drilled through my board and twist tied them again on the back.


Then the final step was to hang them on the wall. 

 
This one I had to redo because I first attached the vase to it upside down.  It only took me a few extra minutes to redo thankfully.


 Hurray for a cute and easy way to bring the outdoors into your home!


 I realize the house will eventually get too warm for the primrose and they will eventually out grow their containers but I designed this to be easily taken apart and changed from time to time depending on the season.  You could even put fake flowers or some cut flowers inside if you wanted.

 Looking at the flowers through the sunburst mirror.


January 16, 2012

D.I.Y. Sunburst Mirror

 This weekend project was to make an impressive star burst mirror using very simply materials.  I have been looking for ideas to dress up the entryway and make it flow a little better with the office area.  I thought about hanging up our long boards in this area but they are pretty heavy and I didn't want to damage the walls with a lot of hardware.  Plus the wheels get very dirty and would make the white walls look dingy after awhile so instead I browsed the Internet for ideas and found this great mirror tutorial at hisugarplum.blogspot.com.  It was very simple to make and only cost about 10 dollars.  I bought a pack of shims at home depot for 5 dollars, a 6" and a 12" wooden floral wreath at Michael's for 3 dollars and a 10" mirror from a thrift store.  It only took a few hours to put together and was hanging on the wall the following day.

 Once the mirror was hung on the wall it looked great!  It was the perfect size to fit the wall and coordinated perfectly with the wood details from the office area and the hall closet.  This was the best idea I've found in awhile.  I love this mirror!


After hanging up the mirror Oz wanted to take my photo in the mirror and describe how the mirror was constructed.  It was not a very good explanation on my part, so if you want to see how to make the mirror for yourself click here

January 10, 2012

National Houseplant Appreciation Day

Today is National Houseplant Appreciation Day.  I'm not making this up.  You can find it online if you type in obscure calendar holidays.  Anyways, in honor of this day, this morning I pampered my houseplants by watering, fertilizing and dusting them.  I also did a bug check.  It's a good thing I did because one of my orchids had a few scales on it.  Yuck!  Scale is not something I want on my plants, it is very tough to get rid of it gets to be a serious problem.  But luckily I caught the infestation in time before it spread to all the houseplants.

Here are a few photos to show off my houseplants:


This is a lady slipper orchid.  I bought this one last week when I went up to the Portland Plant Market for work duties.  I love lady slippers and I really like how dark this one is.
This is the first orchid I bought 3 years ago.  It is so delicate looking and the blooms last up to 9 months!  Last year I successfully got it to re bloom, the first time since taking it home a few years prior.

 This is a before and after shot of the hoya plant I rescued from being trash 2-3 years ago.  It only had 2 leaves on it when I saved it and now it has vines 3 feet long.  I give credit to saving this plant to a good sunny location and keeping it very dry between waterings.

 I recently put in a houseplant shelf above the office area.  Before, my plants were scattered everywhere and never had a permanent home.  I chose this spot because they are out of the way, there is plenty of light and it really added a natural look to this corner. I also switched out the light in this corner with a full spectrum light that houseplants need if they aren't exposed to enough natural sunlight. Soon I would like to replant all of these plants and put them into matching pottery.  I haven't decided how to do this yet but I think it will look great when everything is the same color combination.


 Lastly, here is my Christmas cactus a friend gave me a cutting of 2 years ago.  This one is sitting in my bedroom.  I love this plant because it blooms once in winter and again in spring.  I like the orange/pink combination of its petals.

Well, that's all for me.  Be sure and pamper your own houseplants today.  Even just a kind word can make all the difference to your plants!

December 08, 2011

Giving the Tree the Trim

Last night I put the finishing touches on our Christmas tree at home.  We brought it home 2 weeks ago but because I was sick forever it seemed like I didn't get a chance to start decorating it until this weekend.  I also kept running out of craft supplies so I had to keep going back to the craft store in order to finish the tree.  Truth be told we finished decorating it the night we walked it down the street from the boy scout lot but after we had all the ornaments up I decided it was not very impressive.  After all the trees I decorated at the store and saw at the Festival of Trees I decided ours could be much better with some cheap and easy add-ons.  So I started over!

Above is the first attempt at decorating our tree.  It was fine but there was no central theme connecting our ornaments to each other.  It looked like they were thrown on at random.  Also, there just wasn't as many ornaments as we needed to fill in a 6 1/2 foot tree.  So with some clever thinking, I put together more ornaments that didn't cost much and that would tie the whole tree together.

This was the first tree topper we put up there.  Its just a plain star looking lonely on the top branch.

This photo shows 3 of the new additions to the tree that didn't cost more than $20 altogether to make.  I bought pink tissue paper and made a set of 10 carnation like flowers that were about 6 inches in diameter that I stuck around the tree.  I also bought a stack of scrapbook paper for $10 and made a set of 15 paper fans that I clothes pinned to the tree as well as 15 silhouettes of Charlotte, the bunnies, Oz and myself.  I traced our images onto printed paper then layered it onto a second sheet of paper and then hot glued fancy ribbon around the edges.  On Charlotte's I added a cut out heart and scarf detail.

Bunny girl's photo.  Also in this photo is another addition to the tree.  The purple glitter garland in the top of the photo.  I probably spent the most on the garland.  I bought 4 strands of this to wrap around the tree.  I paid about $36 for the garland.

Oz.  His beard makes him look not as close to himself as I thought.  He kinda turned out like Santa.

Me. Altogether I made 3 sets of each family member.  I made an extra 4th set that I am saving to clip onto our stockings when I finish them so I can tell everyone's apart.

My buddy boy.  He's so dapper!

I made a bunch of these tree ornaments a few years ago and was selling them at a craft market.  I had a bunch of misc. buttons my grandma gave me so I used them for these trees.  I found them in my Christmas collection and thought they would look really nice with our tree.

My beach gnome I bought in Lincoln city when my mom and nana came to visit.  Poor little gnome had a fall the other night and I had to hot glue his leg back on.  He is resting while it recovers.

The improved tree topper.  I left the silver star at the top and added two magnolia sprays I bought 2 for 1.  I thought they were very beautiful and elegant.  And then I added my favorite owl tree topper I bought a few years ago.  He is so classic he matches many different tree designs.


From the before photo to the after photos it looks like I removed a lot of the ornaments that were first on there and replaced them with all new ones.  Actually the only one that I did not keep on the tree were these paper origami ones I made a few years ago.  I left all the other ornaments on the tree.   Just adding a few new ornaments and decorations that shared a theme really made the whole tree one completely work of art.  And the best part is I only spent about $60 for new decorations that will last for quite a few years.  I had lots of fun making my own ornaments and putting the tree together.  I am still working on the decorations for the rest of the house.  When I finish I will be sure to add them to the blog.

The final touch to the Christmas tree is a pen around it to keep Charlotte away from the presents and the ornaments.  I caught her twice running round with packages and ornaments from the tree.  Naughty girl!
Related Posts Plugin for WordPress, Blogger...