Showing posts with label Craft Projects. Show all posts

September 02, 2012

September is National Sewing Month

Grab your scissors and lots of fabric because National Sewing Month has just begun and if you are like me then you have TONS of projects to catch up on.


Here is a list of some of the sewing projects I will be working on the next month:
1. hem and alter clothes for real estate attire
2. finish sewing stockings and mini yoyo quilts for Christmas
3. work on suitcase dog beds and sew up pillows for the insides
4. make Charlotte a couple winter jackets for when its chilly outside
5. make a new dress and nightgown out of the fabric shown above
6. finally get around to fixed Oz's pile of shirts and pants he has asked me to alter over the years

As you can see I will have my hands full this month working on all these sewing projects.  Wish me luck!

August 21, 2012

Dreaming of a New Craft Room

Ok, so if you follow my blog at all you may be familiar with my on going desire to have a functioning craft room.  I am sloooowly getting there.  Last summer I bought/painted a sewing desk, found a giant bookcase from IKEA and made a rack to hold all of my ribbon and thread.  Sounds like I have it all figured out right?  Well....

Currently the bunnies and their pen are being housed in my room (the only one with a/c) so its a pretty tight squeeze for everything in there.  At least all of my craft supplies have a home.  But, the other problem is I have run out of storage for my packaging supplies.  I am creating bigger pieces such as dog beds and skateboard dishes and don't have any room to store the boxes I've been collecting to ship them.

So this weekend I got super excited to start designing my very own craft room for next year if we hopefully find a larger place.  And while I'm waiting for that day to come I have been keeping myself busy designing my dream craft space.  Here is a recap in photos of what I've done so far and my plans for my new room in the future:


This is what I started with at the beginning of last year.  It was far from ideal. I did not have enough storage for anything and it all ended up on the floor.


So then I bought this monster shelf from IKEA to house all of my crafts and books.  Which is an amazing feat since I have a ridiculous amount of stuff. 


I then got this great desk from Brandy and painted it red and added new hardware to match the black shelf.  While I was at it I also painted my dresser pictured in the previous photo to match the desk.


Here is the shelf in the room with my ribbon rack above.  As you can see, it is in the way of the closet which makes finding my shoes in the mornings really difficult.  But it works for the time being.


So now I am at the point of picking out new colors for my future craft area.  I know I want to continue with red and black since I already have those items.  I think I also want to throw in a bit of turquoise accents and maybe an off white or beige color for the walls.


Here is a sketch I put together yesterday of my ideal craft room. My red dresser would be the focal point with a couch and my sewing desk positioned where I can also watch tv while I work or when friends come over.  To the side I have my large bookcase with all of my craft supplies.  I would use the closet space for storage of my larger projects and packing materials. I also thought it would be fun to frame the tv with fabric behind it and a large turquoise picture frame in front.  On pinterest I saw this great idea to have your walls painted one color and then put white molding near the top of the wall and then paint the remainder of the walls and ceiling a sky blue.  It looked really pretty, I would like to try it out.


Here is my proposed floor plan.  Hopefully I can find a bedroom large enough to squeeze in a love seat or small couch! And obviously this is a loose plan since I don't even have a room to make an actual layout for.


I also grabbed some material samples to maybe use for some curtains, pillows or for the tv frame.

I hope you enjoyed my little craft room blog.  It will be a while before I get to set it up so hopefully I won't get too antsy!

July 03, 2012

Super Villian Convention

Calling all Super Villains!  Last weekend to celebrate a friend's 30th birthday we dressed up as villains for a super villain party.  In this photo we have the Hamburglar (Whitney) Cruella Deville(Rachel), the Queen of Hearts (Brandy) and the Wicked Witch of the East (me).

We are dressed to impress!
There was even a part of the house to get our villain mug shots! 
We had to keep Charlotte away from Cruella, she kept eyeing her black and white coat, naughty!
I had a really hard time sitting down in my outfit.  The girls had to help me from choking myself with the roof of the house.
This will do, a cat scratcher to sit on, perfect!  (this is Oz dressed as Bad Santa)
Off with their heads!
Cute little mail man, I mean evil mail man...
A family of trouble makers!
Uh oh, the Hamburglar is at it again!

June 30, 2012

D.I.Y Mailman Costume for Pets


Last weekend Charlotte and I attended a costume party, a Super Villian Convention if you will.  Charlotte was dressed as a mailman (a dog's own super villian).  This was a very easy costume.  The only thing I had to buy was a little boy's button down blue shirt from goodwill.


Here is the boy's shirt after I cute the waist and arms to fit Charlotte's body.  I rolled the sleeves to hide the unfinished hem.

 Using tan fabric I had on hand I fashioned a very simple sling bad and added a cuff from the little boy's shirt to add a decorative label to the bag.

 Then I added three envelopes and hot glued them to the bag.  They were addressed to Miss Cat Woman, Mr. Big Bad Wolf and Mr. Sharekhan from the Jungle book (all Super villians).  Then I used some puff paint to add a U.S. Mail logo to her bag.

Theres my sweet girl!  Her outfit was very simple.  It only took me an hour from start to finish.  (plus a few hours for the puff paint to dry.)

Coming up:  photos from the rest of the super villian party.  Stay tuned!

June 22, 2012

Guest Artist: Gina Hoppe


A friend of mine, Gina Hoppe, is an amazing artist and I FINALLY am getting around to featuring her on my blog.  Gina just graduated from OSU in Animal Sciences with minors in both chemistry and art.  Gina just got accepted to study veterinary sciences in Dublin, Ireland starting this fall.  So, as her friend and fellow artist, I am promoting her very talented skills and asking everyone to please check out her etsy site for original block prints and encaustic works.  Click HERE to go to her etsy page.

Encaustic Abstract Giclee Print Blue and Black
This is one of Gina's encaustic abtract giclee Prints

Gina dabbles in a variety of art techniques including wood blocks, lithography and encaustics.  Encaustics involve layers of melted beeswax and pigment that mix together in unique textures.  She also has a series of prints from collages that she made when she studied abroad at sea last spring in 2011.  She took inspiration from many of the places she visited including Vietnam, India and Ghana.

Please check out the artwork of a very talented woman and help support her on her future endeavors in Dublin!  Thanks for reading everyone!

April 12, 2012

D.I.Y. Container Fish Pond


For my 'big' spring garden project this year I decided I really wanted to make use of the unused wine barrel I had bought to use as a fountain two years ago.  It didn't work as well has I had planned so I moved it to the backyard and am turning it into a fish pond.  I put 'big' in quotations because this was actually a fairly simple project compared to some of the other ones I have tacked in the past.  For less than $150 you too can enjoy the relaxing sound of a beautiful, functioning, living water feature even if all you have is a small porch. All you need is a few days to set it up and you're done!


Step 1: The Container
I had a wine barrel on hand that I bought two years ago for about $30 at Bi-mart.  Any container that can hold water can also be used as long as water won't leak out.  My barrel was already painted from before but you can always just leave it natural looking if you prefer. When you find the location you want your barrel, place some cement pavers underneath to keep the bottom from getting wood rot if it going to be sitting somewhere it can get wet easily.  This wine barrel holds about 31 gallons of water, a great size for some fish and water plants.


This is the wine barrel I painted and moved to the backyard and replaced a dying rose bush with.

Step 2: Water
Once you have your container in place be sure you have cleaned out the inside of any debris in it.  Fill the container almost to the top with water.  Next, if you plan to add fish to yours you will need to wait 24 hours before adding them in.  The chlorine found in the tap water can be deadly to fish and needs about a day to evaporate from the water.  You can also play it very safe and buy a product called Pond-zyme that helps clean the water and remove harmful ammonia that can also build up.  It contains beneficial bacteria that make the water a pleasant environment for the fish.  I bought the powder rather than the liquid version because it lasts 3 times as long as the liquid.  Follow mixing instructions and tap it onto the surface of the pond.  It will slowly make its way to the bottom of your pond and clean the water for you.


Step 3: Plants
Next comes the fun part of choosing what plants to place in your pond.  Most websites I looked at recommended have 3 different types of plants for your pond:
  • an oxygenating plant (one that grows underwater).  These provide oxygen for the fish
  • a floating plant (one like a water lily that grows on the water surface)
  • and a thrill factor (one that gives some height to your pond for excitement)

Above, I have sketched out what my pond will look like with the various plants I have chosen.  I picked Anacharis for my oxygenating plant, a yellow blooming water lily to float on the water surface and a pickerel weed for my thrill factor.  The pickerel weed will attract butterflies and sometimes hummingbirds to the pond.  I also decided to experiment with creeping jenny and corkscrew rush, not usually considered water plants but I decided to give it a shot and see if they survive.

This is the Anacharis.  I picked it up at the local fish and exotic animal pet shop in Corvallis.  They didn't have their other pond plants in yet so I went to home depot and picked out a few other items.

My waterlily.  I probably should have went for a dwarf variety since my pond isn't very large but they didn't have any dwarf plants so I went with this yellow one since I liked its color the best.

This is the pickerel weed.  It grows in shallow water so I built a shelf for it and stuck the other two small plants in it that also liked to be near the water's edge.

The box even shows a butterfly one it so it must draw them in, right?!

Here is the corkscrew rush and creeping jenny I bought from my garden center.  Neither are meant to be used directly in ponds but I liked them and thought I would experiment and see if they survived.  If they don't, oh well!


To plant your pond vegetation I just followed the instructions on the packages for the water lily and pickerel weed.  For the anacharis all you need to do is anchor it to the bottom of your pond with some gravel.

Word of the wise:  DON'T use regular potting soil to plant up your plants.  It is too light and floats to the top and makes the water murky.  Really murky.  If you do need to use soil for some of your plants use a clay soil that is recommended for ponds.  It won't cloud the water like potting soils do.

Also, when you are lowering your plants into the pond do it very slowly so that the rushing water doesn't unsettle any of the dirt or gravel in your containers.  This will also help keep the water clear.

Here is a fine example of what not to do.  See all the floating debris in the water and on my upper plant shelf? That is all potting soil I didn't know I should not use.  To fix this problem I took out all the plants, dumped out all the water, cleaned the barrel again, refilled it with water and then I replanted my plants using just gravel and clay soil that came with the water lily.  For the corkscrew rush and creeping jenny, since they were already planted in soil, I used the garden hose and sprayed off all the soil and just planted their bare roots into the gravel with the pickerel weed.

 Much better! Now you can see all the way to the bottom of the barrel
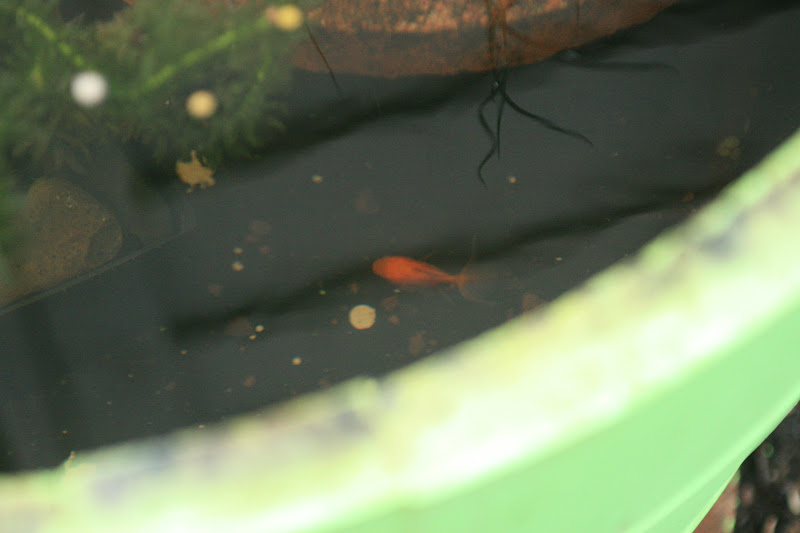
Step 4: Fish
When selecting fish make sure to choose varieties that will do well in the pond.  I stopped by the exotic pet shop but didn't find any fish to my liking and then went to Petco and found exactly what I wanted.  They had many fish suited for pond living that were inexpensive and really cute.  I settled on four fan tailed goldfish that were already in the same fish tank together so I knew they wouldn't compete with each other for food or living area.  The rule of thumb of choosing how many fish will fit in your container is:  One inch of fish should have no less than 5 gallons of water for comfortable living.  Therefore a 30 gallon tank should hold 6 inches of fish.  My fish were about an inch in length so I decide to buy four in case they need some growing room still.

 Here are my Petco fish.  The label on the aquarium even said they did well in ponds.  I named the two calico ones Sherlock and Holmes, the orange one is Watson and the red head is Mrs. Pennyworth (she is much chubbier than the rest, she could be pregnant.  We're not sure).

 Before you dump your new fish into their new habitat it is recommended to float the bag on the surface for at least a half an hour so that the bag temperature can slowly change to the new water temp and not shock the fish.

There's Watson investigating the bottom of the pond.  He seems to be the most adventurous so far.

This is the plant shelf that is holding the pickerel weed, corkscrew rush and creeping jenny.  I adjusted the height of the shelf so it would rest parallel with the water level so that small insects, birds and other critters could come get a comfortable drink without falling into the pond.

 
See any fish in there Charlotte?

So that's my pond.  I also ordered a small solar powered fountain online for $16 to help areate the water some more.  I didn't realize it shipped from China when I bought it so I might be waiting a while before it arrives. 

I shall continue posting photos of how my pond and fish are progressing through the season as the plants start to grow and fill in the pond more.  So far its been two days and my fish are still alive!!!  Hurray me!

April 06, 2012

Sunshine, Please Return and Bring Back my Motivation!

As you may have noticed I haven't been posting many blogs lately.  I have been busy with work getting the store ready for the hustle and bustle of the spring months that are just around the corner.  In my spare time I have been just as busy with all sorts of activities.  My mom, brother and Nana came from Nevada and stayed St. Patty's weekend.   While they were visiting we went to the coast for a day, we did some gift shopping at Schmidt's, we introduced them to Block 15 and Market of Choice, and we played pool and drank margaritas in celebration of St. Patty's Day!

My mom, brother and their dog, Buster at Nye Beach

The day they left, Corvallis woke up to a snow storm that lasted all day long.   And since then the weather has been too terrible to work outside I have been focusing on indoor projects.  I did try and do some yard work this last Monday when it was sunny.  I tried mowing the lawn but it was still too wet and Charlotte was not making it easy on me because she likes to bark at the push mower because it "chases" her across the backyard.

 Playing some frizz bee tug of war out in the snow covered park
And then I have been recovering from being under the weather the last few weeks.  It wasn't serious but I took a few days off from work so that I wouldn't over do it and get worse later on in the busy spring gardening season.  I'm finally feeling close to 100% and feel like I've regained my energy as well as motivation for work and craft projects as well as blogging!

 Charlotte basking in the sun when it came out for a few hours

When I've been feeling up to it I've been working on items for my etsy shop.  I recently put most of my decorations I made for my Harry Potter party a while back.  I have also been in the middle of making some really adorable dog beds made from discarded dresser drawers and vintage suitcases.  My shop has been doing fairly well this year which is exciting.  It gives me encouragement that I should keep coming up with new ideas and products to list online.

Well fellow blog readers, that is a recap of what I have been up to this past month and a half.  I am hoping April will bring lots of sunshine and fun outing with good people to make the most of this 2012 spring.

March 13, 2012

Wall Mounted Stag Fern

 On Sunday I finally finished this stag fern project I have been working on since January.  If you remember my blog post from back then, Amy and I saw these really cool stag ferns that were mounted on pieces of wood at the Portland Nursery.  The ones we saw were very large and cost more than $100 for some of them.  At the nursery I bought a small stag fern for $5 and took it home to mount on my own wooden board.  I planned to finish my project the same weekend I went to the nursery but I haven't been inspired to work on it until this weekend when I went up to Portland IKEA with Amy again and I bought new pottery for my indoor houseplants.  When I got home Sunday afternoon I got down and dirty right away and replanted all of my houseplants and then mounted my stag fern onto its wooden board.

These are the stag ferns we saw at the Portland Nursery on Division St.  The largest one is probably about 3 1/2 feet tall.

 Here are my mounting supplies.  I used a wooden board similar to the one I cut in half for my indoor primrose display, a handful of green basket moss, an airy onion bag and of course my fern.  I also used a staple gun, garden twine and picture frame mounting kit.

First I decorated my board.  I cut off the "feet" that were on the board and then painted the background in brown and orange so that it would match the living room decor.  At first I stained it a dark walnut hue and hand painted the Webster's definition of a stag fern on the board but I did not like the way my hand writing looked so I covered it up with craft paint.  If you look closely you can still see where my writing was.  Then, once the paint dried I put a few coats of polyurethane to seal it from moisture when I water the plant each week.  After it dried I mounted my picture frame hook onto the back before attaching the fern.

Then I cut a 4x6 inch corner of the mess bag to hold the moss that the fern will eventually grow into.  The bag needed to be airy so the roots could easily pass through.

Then using the staple gun I mounted the bag filled with moss just above center of the wooden board.  Since the foliage fell down so low, it looked more balanced to place the bag higher than the center.

Once the bag was in place I took the fern out of its container and placed it on the bag.  Then I filled the area around the fern with more green moss to hide the rest of the red bag.  To keep the fern and the moss in place I wrapped garden twine around the fern, mound and board to keep everything tight and from falling apart.  Eventually the fern will grow a large frond shield that will grab onto the wood and anchor it there by itself.  

To water the fern I simply take it off the wall and put it on the ground outside, water it with a watering can and let the wood air dry before hanging it on the wall again.

This was the perfect item to add to my living room collage.  I am really close to finishing the whole collage and then I will post photos of how it looks with the stag fern added.
Related Posts Plugin for WordPress, Blogger...