In honor of the 7th movie and my birthday (both in November) I decided the best way to celebrate my birthday was with a Harry Potter themed party. Everyone is going to be dressed as HP characters and I have spent the last two weeks making Harry Potter crafts for the party. I still have another month before the party begins, but here are some crafts that I have finished so far. The objective was to recreate as many iconic HP scenes and props while not spending a fortune. Stay tuned because I will be adding more photos as I make more crafts.
The first craft I started on was making 4 house banners. I painted the four house crests on unstretched canvas that I had left over from other art projects. Then I purchased 1/2 yard of each of the four house colors for the banners ( each cost $1.50).
Above are the four crests I painted using acrylic paint on canvas.
Once I hemmed the edges of the four banners I pinned each design close to the center of each piece of fabric. I then used the zigzag technique on my sewing machine and made sure I got a close together stitch all the way around my design. Altogether I spent $10 on fabric and misc. paint supplies. ( I will post finished photos soon when I hang the banners up)
Next, I wanted to make my own version of the sorting hat and have house badges to hand out to guests as a party favor. To make the badges I found an image of each house crest online, printed 12 of each design and hot glued them onto a pin (I bought a pack of 48 for $3.49 at a craft store).
To make a sorting hat I mostly just used some glue and brown paper. First I made the frame using a circle for the base (a cardboard pizza bottom) and made a cone top with some paper. To add definition to the eyes and mouth I taped together brown paper until I was satisfied with the shape and the depth it stuck out from the hat. Then I cut thin strips of brown paper and using a mixture of 2 parts glue and 1 part water I used my glue mix to paper mache the rest of the sorting hat.
Here is the finished product
To display the sorting hat with the badges I found a black box and labeled it as sorting hat and wrote down easy instructions. Thats it! An awesome sorting hat for free.
To add a feel of really being in Hogwarts I made my own posters and pictures with people you would probably see if you were in Hogwarts.
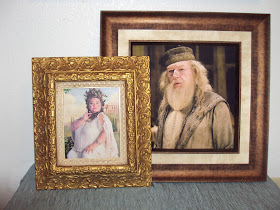
I found two large frames at goodwill for $6 each. I then found images of the Fat Lady and of Dumbledore online. Since the frames were larger than what my computer can print I used photoshop to print the images in overlapping sections so when I pieced them together I couldn't even tell they were four difference pieces of paper overlapping. I used thicker matte paper to they wouldn't wave like regular paper sometimes does. (For Dumbledore I even used a watercolor technique to make it look like it was printed on canvas).
Then I made wanted posters of Sirius Black and HP. I bought two posters from staples for $3 each and then printed out the wanted information online. I thought about tracing each photo and writing on to each poster and painting them on but I thought it would take too long so instead I used modge podge and glued each section onto the posters. I used a cream colored paper, it blended better then the white.
The finished project turned out really well


